Commonly used metadata formats with SC3
In the previous chapter we imported metadata from a data centre to configure the real-time acquisition of the GEOFON network. Now we will introduce the different metadata formats that you can use.
Today there are three common formats to store metadata:
- FDSN StationXML [REF:FIXME]
- SC3 inventory
- Dataless SEED [REF:FIXME] - the old de facto standard.
Dataless SEED can be imported to, and exported from, SeisComP if needed.
SC3 inventory
Due to historical reasons, there are two (equivalent) XML representations of the SC3 inventory: Arclink XML (which pre-dates SC3) and SC3 XML.
When importing metadata into an SC3 system, using either of those guarantees 100% lossless conversion.
The data model
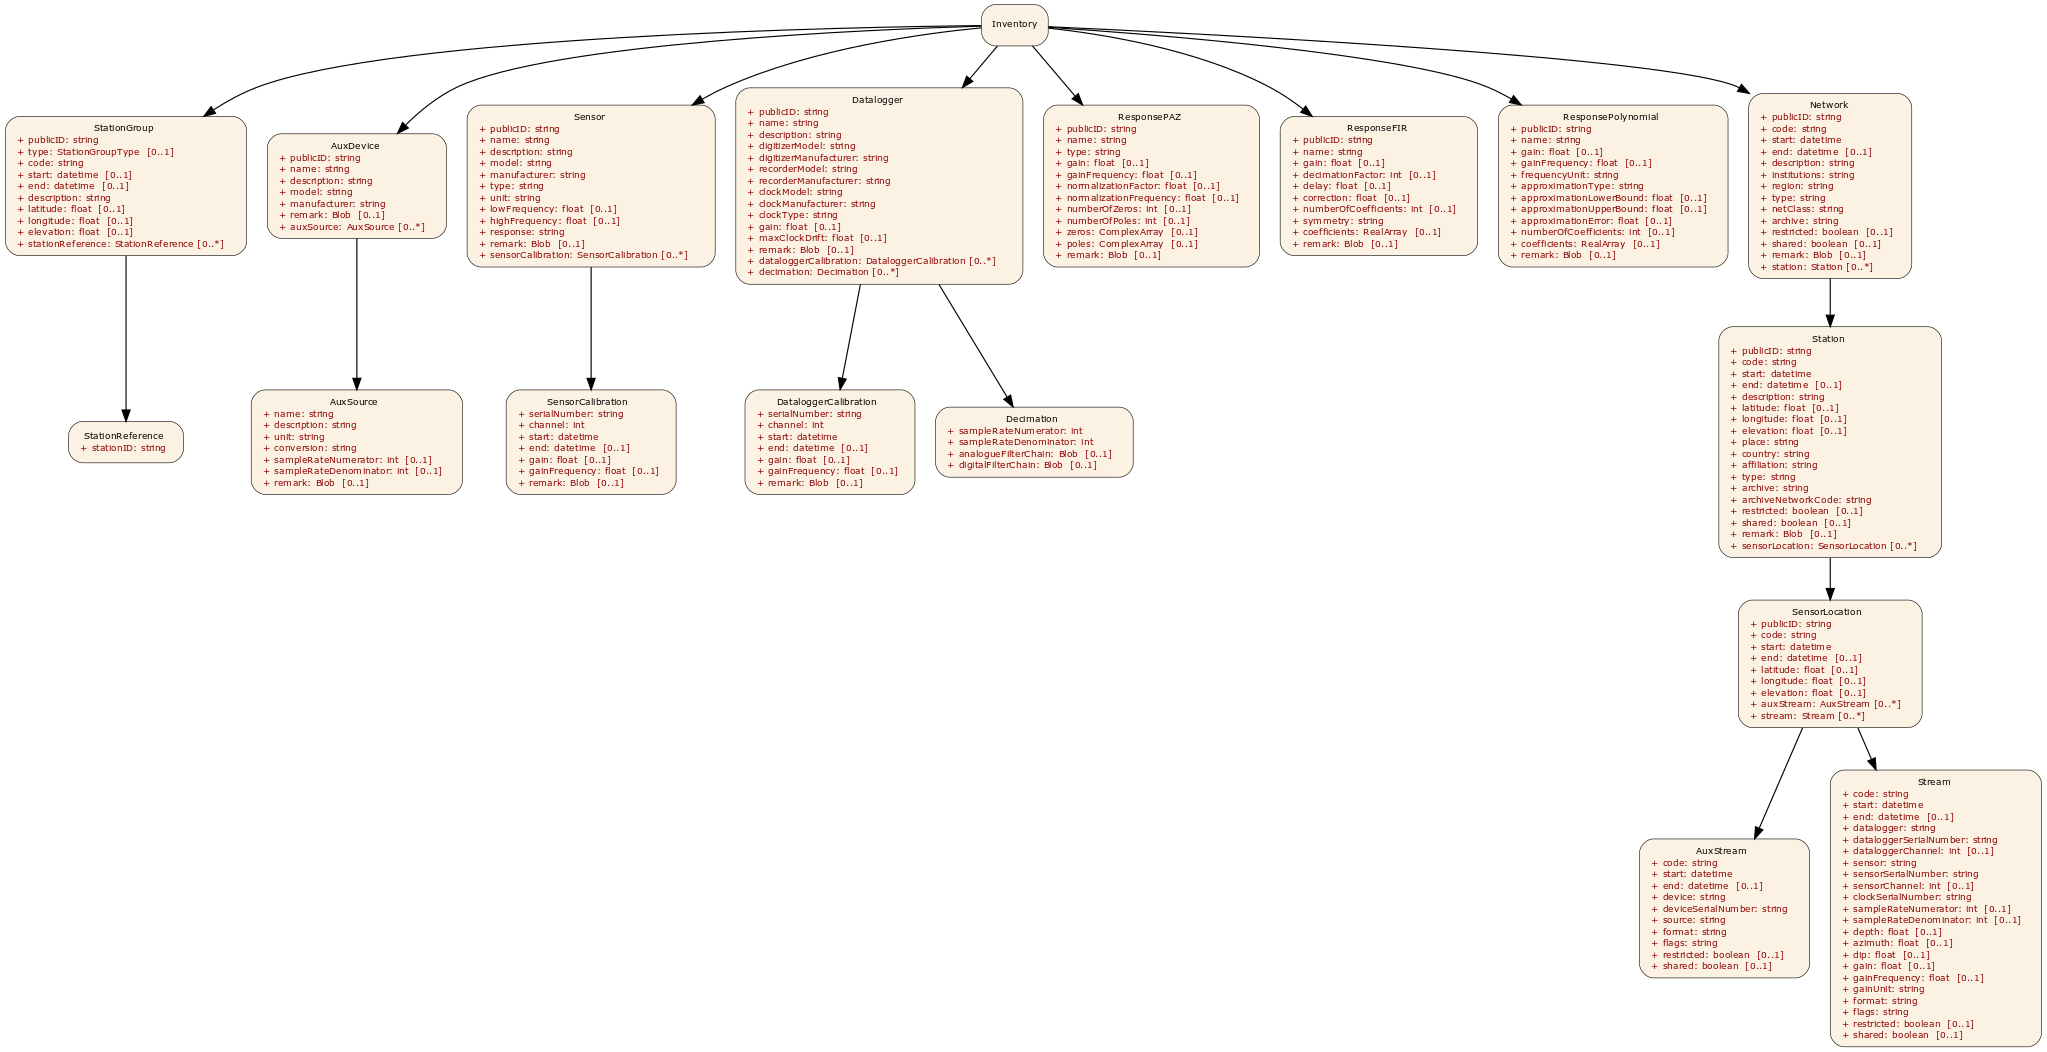
Click on this link (SeisComP documentation) to open the image and be able to zoom in.
| FIXME: | Update link to jakarta e.g. |
|---|
Arclink XML example
An Arclink representation of the inventory:
<inventory xmlns="http://geofon.gfz-potsdam.de/ns/Inventory/1.0/">
  <network archive="GFZ" code="CX" description="IPOC Seismic Network (Integrated Plate
   boundary Observatory Chile)" end="" institutions="GFZ/IPGP" netClass="p"
   publicID="Network#20130513163602.210354.2" region="Northern Chile" restricted="false"
   shared="true" start="1980-01-01T00:00:00.0000Z" type="VBB">
    <remark/>
    <station affiliation="IPOC" archive="GFZ" archiveNetworkCode="CX" code="PB06"
     country="Chile" description="IPOC Station PB06, Chile" elevation="1440.0" end=""
     latitude="-22.7058" longitude="-69.57188" place="PB06"
     publicID="Station#20130513163602.244857.24" restricted="false" shared="true"
     start="2007-03-04T00:00:00.0000Z" type="">
      <remark/>
      <sensorLocation code="" elevation="1440.0" end="" latitude="-22.7058"
       longitude="-69.57188" publicID="SensorLocation#20130513163602.244886.25"
       start="2007-03-04T00:00:00.0000Z">
        <stream azimuth="0.0" clockSerialNumber="" code="LLZ"
         datalogger="Datalogger#20130513163602.212591.7" dataloggerChannel="0"
         dataloggerSerialNumber="1843" depth="0.0" dip="-90.0" end="" flags="GC"
         format="Steim2" gain="427566.942" gainFrequency="1.0" gainUnit="M/S**2"
         restricted="false" sampleRateDenominator="1" sampleRateNumerator="1"
         sensor="Sensor#20130513163602.219932.14" sensorChannel="0"
         sensorSerialNumber="2555" shared="true" start="2007-03-04T00:00:00.0000Z" />
      </sensorLocation>
    </station>
  </network>
</inventory>
SeisComP XML example
A SC3 representation of inventory:
<seiscomp xmlns="http://geofon.gfz-potsdam.de/ns/seiscomp3-schema/0.7" version="0.7">
  <Inventory>
    <network publicID="Network#20130513163602.210354.2" code="CX">
      <start>1980-01-01T00:00:00.0000Z</start>
      <description>IPOC Seismic Network (Integrated Plate boundary Observatory Chile)
      </description>
      <institutions>GFZ/IPGP</institutions>
      <region>Northern Chile</region>
      <type>VBB</type>
      <netClass>p</netClass>
      <archive>GFZ</archive>
      <restricted>false</restricted>
      <shared>true</shared>
      <remark/>
      <station publicID="Station#20130513163602.244857.24" code="PB06"
       archiveNetworkCode="CX">
        <start>2007-03-04T00:00:00.0000Z</start>
        <description>IPOC Station PB06, Chile</description>
        <latitude>-22.7058</latitude>
        <longitude>-69.57188</longitude>
        <elevation>1440</elevation>
        <place>PB06</place>
        <country>Chile</country>
        <affiliation>IPOC</affiliation>
        <archive>GFZ</archive>
        <restricted>false</restricted>
        <shared>true</shared>
        <remark/>
        <sensorLocation publicID="SensorLocation#20130513163602.244886.25" code="">
          <start>2007-03-04T00:00:00.0000Z</start>
          <latitude>-22.7058</latitude>
          <longitude>-69.57188</longitude>
          <elevation>1440</elevation>
          <stream code="LLZ" datalogger="Datalogger#20130513163602.212591.7"
           sensor="Sensor#20130513163602.219932.14">
            <start>2007-03-04T00:00:00.0000Z</start>
            <dataloggerSerialNumber>1843</dataloggerSerialNumber>
            <dataloggerChannel>0</dataloggerChannel>
            <sensorSerialNumber>2555</sensorSerialNumber>
            <sensorChannel>0</sensorChannel>
            <sampleRateNumerator>1</sampleRateNumerator>
            <sampleRateDenominator>1</sampleRateDenominator>
            <depth>0</depth>
            <azimuth>0</azimuth>
            <dip>-90</dip>
            <gain>427566.942</gain>
            <gainFrequency>1</gainFrequency>
            <gainUnit>M/S**2</gainUnit>
            <format>Steim2</format>
            <flags>GC</flags>
            <restricted>false</restricted>
            <shared>true</shared>
          </stream>
        </sensorLocation>
      </station>
    </network>
  </Inventory>
</seiscomp>
Importing metadata to SC3
It is easiest to use the import function of the scconfig GUI. Alternatively, you can import from the command line:
From FDSN StationXML:
fdsnxml2inv -f station.xml > etc/inventory/mynetwork.xml
From SeisComP XML with filtering:
invextr -f --chans 'NE.STA.*' mynetwork.xml > etc/inventory/mynetwork.xml
From Arclink XML:
arclink2inv -f inventory.xml >etc/inventory/mynetwork.xml
From a dataless SEED volume:
dlsv2inv -f mynetwork.seed > etc/inventory/mynetwork.xml
Things to avoid
- Requesting in dataless format from Arclink and importing with dlsv2inv (request inventory and use arclink2inv instead).
- Converting XML to dataless, editing with PDCC, converting dataless back to XML (use invextr or SMP instead).
How to get inventory
We will request the inventory from all stations belonging to network GE.
Option 1: Using FDSN web services
The FDSN web services are the standard proposed by the FDSN and have been deployed at almost every data centre [1]. One of them is called fdsnws-station and is the service to contact to get all information related to stations, sensors, responses, etc.
To get data from the fdsnws-station web service you can use any web client (browser or command line). For instance, the wget command. The file you will receive will be in StationXML format.
$ wget "http://geofon.gfz-potsdam.de/fdsnws/station/1/query?net=GE&level=response" -O ge.xml
Option 2: Using fdsnws_fetch
This is described in the chapter Using fdsnws_fetch.
Option 3: Using arclink_fetch
arclink_fetch is a command-line client which allows you to send requests (e.g. data, inventory) to Arclink servers. The inventory information you receive will be in Inventory XML format.
$ echo "1980,1,1,0,0,0 2030,1,1,0,0,0 GE * * *" | arclink_fetch
   -u user@mymailaddress.com -k inv -vvv -o ge.xml
Option 4: Using WebDC3
WebDC3 is a graphical interface which allows you not only to send requests to Arclink servers, but also to explore available stations and query event catalogs from different data centres among other possibilities.
You can find detailed information about WebDC3 in the on-line documentation at http://webdc3.readthedocs.io/en/latest/
| FIXME: | This is about event selection! |
|---|
- Go to http://eida.gfz-potsdam.de/webdc3 with a browser.
- Click on “Explore events” and select a date interval from 24 August 2016 to 25 August 2016 and a minimum magnitude of 6.
- Shift+click on the map to select a square around Europe and then click on “Search”.
- Only one event in Central Italy should appear in the list on the right part of the page.
- Click on “Explore stations” and move the slider to select only the year 2016 and only “Public permanent nets” on the Network type list.
- Select “by Events” on the “Stations” section to select stations based on their distance related to the selected event.
- Select stations only to a distance from the event less than 15 degrees.
- Click on the BH entry in the list of streams and then “Search”.
- Between 600 and 700 stations should appear on the list below the event.
- Go to the third tab, named “Submit request”.
- Click on “Absolute Mode” for the “Time Window Selection” and select time window from 24-08-2016 to 25-08-2016.
- In the “Request type” section, click on “Metadata (Inventory XML)”
- Enter your email address and click “Review”.
- If everything looks correctly click on “Submit”.
- Go to the fourth tab, called “Download Data”.
- In the “Recent requests” block, click on your request and check its status periodically with “Refresh”
- Display the logs by clicking on the “plus (+) character.
- When it’s ready, click to download the data.
Option 4: Creating your own inventory
If you would like to create you own inventory you may try to use some tools like SMP. This is an online tool which you can use at https://test.gempa.de/smp/ (beta version). Before doing so, you will need to create an account at https://seismo.gempa.de/smp/ .
| [1] | International Federation of Digital Seismograph Networks, 2016. “FDSN Web Services”, http://www.fdsn.org/webservices/ |